Tower Tier List: Ultimate Blitz Rankings [Eternal Update]
In *Tower Blitz*, starting with just one tower type, you progressively unlock a diverse array of towers, each boasting unique strengths and weaknesses. To help you tailor your gameplay to your preferred strategy, we present a comprehensive tier list of all the towers available in *Tower Blitz*.
All Towers in Tower Blitz Ranked
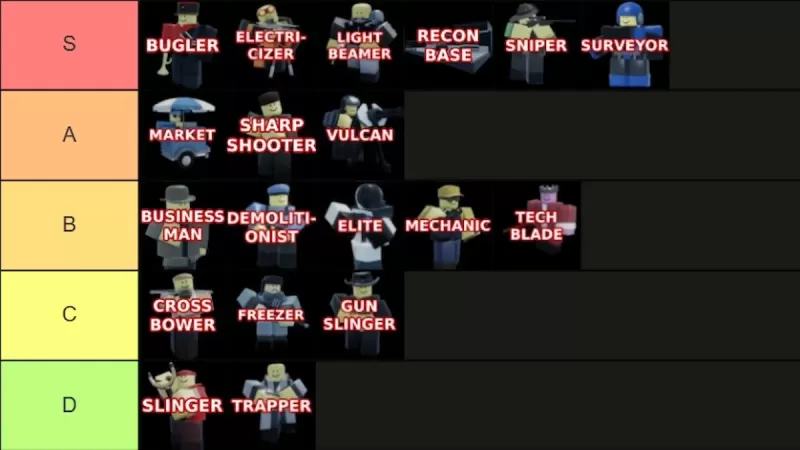
Our rankings categorize all in-game towers from S-Tier to D-Tier, assessing their abilities, upgrade paths, cost, and overall efficiency. **S-Tier** towers are the cream of the crop, nearly guaranteeing a win on any map when used correctly. **A-Tier** towers are strong but have noticeable flaws. **B-Tier** towers are average, offering neither exceptional advantages nor significant drawbacks. **C-Tier** towers are generally underwhelming, with a few redeeming qualities. **D-Tier** towers are the least effective, often providing little to no value. Below, we dive into the details of each tier.
S-Tier Towers
| Tower | Cost | Explanation | Pros and Cons |
|---|---|---|---|
 | Unlock: **2500 Tokens** (available at Level 25) Placement: **750 Cash** | A powerhouse support tower, essential for Expert mode. It boosts other towers' performance significantly, though it can't buff Recon Bases. | + Massive boost to other towers + Essential for Expert mode - Exclusively a support tower |
 | Unlock: **5500 Tokens** Placement: **3800 Cash** | Ideal for players seeking a more powerful Sniper. It boasts the game's largest range and damage, perfect for late-game placement. | + Enormous power and range + Dual support and damage capabilities - High cost |
 | Unlock: **Complete the contract** Placement: **1800 Cash** | A top-tier tower with unmatched strength, especially when placed on straight paths. Both upgrade paths are excellent, making it a game-changer. | + Exceptionally powerful + Excellent for crowd control - Not viable early-game - Expensive |
 | Unlock: **8000 Tokens** (available at Level 45) Placement: **1000 Cash** | Spawns operatives that fight for you, becoming stronger with upgrades. Both paths are powerful, making it crucial for Expert mode. | + Continuously spawns units + Both paths are overpowered + Ideal for Expert mode - Very expensive upgrades |
 | Unlock: **1500 Tokens** Placement: **500 Cash** | The go-to early-game tower, it remains useful throughout the game, especially in Expert mode. Its bottom path increases speed. | + Best early-game tower + Usable throughout the game + High piercing damage - Slightly slow |
 | Unlock: **Complete the contract** Placement: **700 Cash** | Highly versatile, it can be configured for support or damage. Its flexibility makes it a valuable asset from start to finish. | + Highly adaptable + Usable from start to finish - Limited to 4 placements |
A-Tier Towers
| Tower | Cost | Explanation | Pros and Cons |
|---|---|---|---|
 | Unlock: **1000 Tokens** Placement: **650 Cash** | Great for generating income, particularly through the top path. The bottom path can be a money sink if not managed well. | + Essential for all games, especially multiplayer + Generates profit - Bottom path less effective - Slow initial income |
 | Unlock: **1300 Tokens** Placement: **600 Cash** | Effective early-game tower for crowd control, though its piercing damage is low. Ideal for beginners to transition into mid-game. | + Excellent crowd control and damage + Suitable for beginners - Ineffective in Expert mode - Low defense piercing |
 | Unlock: **3000 Tokens** Placement: **2500 Cash** | A solid mid to late-game choice, with the bottom path offering significant damage and defense piercing, though it starts slowly. | + Very strong + Versatile - Slow to become powerful - No flying detection |
B-Tier Towers
| Tower | Cost | Explanation | Pros and Cons |
|---|---|---|---|
 | Unlock: **Complete the contract** Placement: **800 Cash** | Offers money farming without a Market and some damage, but it's outclassed by more profitable and powerful alternatives. | + Dual money-making and damage + Suitable for early game - Easily replaceable |
 | Unlock: **3500 Tokens** Placement: **900 Cash** | Effective early-game for crowd control and piercing damage, but quickly becomes obsolete with no flying detection. | + Good crowd control and piercing - Limited to early-game - No flying detection |
 | Unlock: **Complete the contract** Placement: **1200 Cash** | Similar to Vulcan but less versatile, with a long cooldown. The bottom path is the most effective use of this tower. | + Strong bottom path - Long cooldown - Expensive |
 | Unlock: **Complete the contract** Placement: **480 Cash** | Useful in mid-game with its variety of turrets, but costly and limited in effectiveness outside of this stage. | + Effective in mid-game - Cost-inefficient |
 | Unlock: **Free** (available at Level 10) Placement: **400 Cash** | A melee tower good for early-game crowd control and tank handling, but hindered by its small range and slow speed. | + Effective crowd control + Early-game efficient - Small range - Slow |
C-Tier Towers
| Tower | Cost | Explanation | Pros and Cons |
|---|---|---|---|
 | Unlock: **200 Tokens** Placement: **400 Cash** | A decent early-game option with long range, but its low damage makes it obsolete after the initial stages. | + Affordable, good starter + Long range - Unusable after early-game - Low damage |
 | Unlock: **450 Tokens** Placement: **400 Cash** | Works well with high-DPS towers against fast enemies, but becomes ineffective once enemies gain freeze immunity. | + Effective against fast enemies - Obsolete post-early-game - Limited enemy effectiveness |
 | Unlock: **500 Tokens** Placement: **400 Cash** | A melee tower with poor range and damage, suitable only for Normal difficulty due to its limitations. | + Acceptable top path - Small range - Ineffective in Hard or Expert |
D-Tier Towers
| Tower | Cost | Explanation | Pros and Cons |
|---|---|---|---|
 | Unlock: **Free** Placement: **200 Cash** | A beginner's tower, useful only for the first few waves due to its poor damage and speed. | + Free - Poor damage and speed - Unusable after initial waves |
 | Unlock: **1000 Tokens** (available at Level 10) Placement: **500 Cash** | Despite its cost, it struggles against even weak enemies, making it an inefficient choice throughout the game. | + Decent bottom path - Not cost-efficient - Often unusable - Struggles throughout the game |
With this detailed tier list, you're now equipped to devise the best strategy for your play style in *Tower Blitz*. For a little boost at the start, don't forget to use our *Tower Blitz* codes to enhance your gameplay experience.


-
1
Every Pokémon Game on the Nintendo Switch in 2025
Feb 25,2025
-
2

Roblox: Trucking Empire Codes (January 2025)
Mar 05,2025
-
3
![Anime Vanguards Tier List – Best Units For Each Gamemode [UPDATE 3.0]](https://images.gzztb.com/uploads/35/17376012656791b0f12fa1c.jpg)
Anime Vanguards Tier List – Best Units For Each Gamemode [UPDATE 3.0]
Feb 27,2025
-
4
Stardew Valley: A Complete Guide To Enchantments & Weapon Forging
Mar 17,2025
-
5

Poring Rush, the casual battling spin-off from hit MMORPG Ragnarok Online, is out now
Dec 30,2024
-
6
Ragnarok X: Next Gen - Complete Enchantment Guide
May 25,2025
-
7
Nvidia RTX 5090 Specs Leak: Rumor Confirmed?
Mar 14,2025
-
8

How To Read Black Panther Lore: The Blood of Kings in Marvel Rivals
Mar 01,2025
-
9
Microsoft to Integrate Copilot AI into Xbox App and Games
May 21,2025
-
10

Hearthstone has kicked off the Year of the Raptor with a myriad of new content
Mar 16,2025
-
Download

The Golden Boy
Casual / 229.00M
Update: Dec 17,2024
-
Download

Niramare Quest
Casual / 626.43M
Update: Feb 21,2023
-
Download
POW
Casual / 38.00M
Update: Dec 19,2024
-
4
Mother's Lesson : Mitsuko
-
5
Gamer Struggles
-
6
How To Raise A Happy Neet
-
7
Poly Pantheon Chapter One V 1.2
-
8
Dictator – Rule the World
-
9
Strobe
-
10
Livetopia: Party